Friday, 23 May 2014

AngularJS Directives, Using Isolated Scope with Attributes

Directives in AngularJS are very powerful, but it takes some time to understand what processes lie behind them.
While creating directives, AngularJS allows you to create an isolated scope with some custom bindings to the parent scope. These bindings are specified by the attribute defined in HTML and the definition of the scope property in the directive definition object.
There are 3 types of binding options which are defined as prefixes in the scope property. The prefix is followed by the attribute name of HTML element. These types are as follows
  1. Text Binding (Prefix: @)
  2. One-way Binding (Prefix: &)
  3. Two-way Binding (Prefix: =)
Let's see how these are defined in directives, and I'll go into details one by one.
JS:
angular.module("myApp",[])  
  .directive("myDirective", function () {
    return {
      restrict: "A",
      scope: {
        text: "@myText",
        twoWayBind: "=myTwoWayBind",
        oneWayBind: "&myOneWayBind"
      }
    };
  }).controller("myController", function ($scope) {
    $scope.foo = {name: "Umur"};
    $scope.bar = "qwe";
});
HTML:
<div ng-controller="myController">  
  <div my-directive
    my-text="hello {{ bar }}"
    my-two-way-bind="foo"
    my-one-way-bind="bar">
  </div>
</div>  

1. Text Binding

Text bindings are prefixed with @, and they are always strings. Whatever you write as attribute value, it will be parsed and returned as strings. Which means anything inside curly braces {{ }}, will reflect the value.
So, if we were to define $scope.username = "Umur", and define the attribute like , the value in the directive scope is going to be hello Umur. This value would be updated in each digest cycle.

2. One-way Binding

One-way bindings are prefixed with & and they can be of any type. They are going be defined as getter functions in the directive scope. See it with example:
Controller:
/* more code */
$scope.someObject = { name:'Umur', id:1 };
/* more code */
HTML:
<my-directive my-attribute="someObject" />
Directive:
{
  scope: {myValue: "&myAttribute"},
  link: function (scope, iElm, iAttrs) {
    var x = scope.myValue();
    // x == {name:"Umur", id:1}
  }
}
Since they are getter functions, they are read-only, any changes to the value will not propagated to higher scopes.

3. Two-way Bindings

Two-way bindings are prefixed by = and can be of any type. These work like actual bindings, any changes to a bound value will be reflected in everywhere.
Let's see it by example:
Controller:
/* more code */
$scope.someObject = { name:'Umur', id:1 };
/* more code */
HTML:
<my-directive my-attribute="someObject" />  
Directive:
{
  scope: {myValue: "=myAtrribute" },
  link: function (scope, iElm, iAttrs) {
    var x = scope.myValue.name;
    // x == "Umur";
    scope.myValue.name = "Kieslowski";
    // if we go to parent scope (controller's scope, in this example)
    // $scope.someObject.name == "Kieslowski";
    // would be true
  }
}

Summary with Code

JS:
angular.module("myApp", [])  
  .directive("myDirective", function () {
    return {
      restrict: "A",
      scope: {
        text: "@myText",
        twoWayBind: "=myTwoWayBind",
        oneWayBind: "&myOneWayBind"
      }
    };
}).controller("myController", function ($scope) {
  $scope.foo = {name: "Umur"};
  $scope.bar = "qwe";
});
HTML:
<div ng-controller="myController">  
  <div my-directive 
       my-text="hello {{ bar }}" 
       my-two-way-bind="foo" 
       my-one-way-bind="bar">
  </div>
</div>  
Results:
/* Directive scope */

in: $scope.text  
out: "hello qwe"  
// this would automatically update the changes of value in digest
// this is always string as dom attributes values are always strings

in: $scope.twoWayBind  
out: {name:"Umur"}  
// this would automatically update the changes of value in digest
// changes in this will be reflected in parent scope

// in directive's scope
in: $scope.twoWayBind.name = "John"

//in parent scope
in: $scope.foo.name  
out: "John"

in: $scope.oneWayBind() // notice the function call, this binding is read only  
out: "qwe"  
// any changes here will not reflect in parent, as this only a getter

Advanced Angular: $parse

If you want to step up in your AngularJS knowledge, $parse is one of the most important services that you should know about. It is used in most of the directives, and opens up your imagination to a new set of possibilities.
So, what does it do? Let's start with a place we all well know: ngClick.
ngClick directive, takes an expression, and executes the expression when the directive element is clicked. So, how does it work internally? Yep, you guessed it: with $parse.
$parse takes an expression, and returns you a function. When you call the returned function with context (more on that later) as first argument. It will execute the expression with the given context.
It will execute the expression with the given context.
Context is a pure javascript object, as far as $parse is concerned. Everything in the expression will be run on this object.
Everything in the expression will be run on this object.
Let's see it with an example:
function MyService($parse) {  
    var context = {
        author: { name: 'Umur'},
        title: '$parse Service',
        doSomething: function (something) {
            alert(something);
        }
    };
    var parsedAuthorNameFn = $parse('author.name');
    var parsedTitleFn = $parse('title');
    var parsedDoSomethingFn = $parse('doSomething(author.name)');

    var authorName = parsedAuthorNameFn(context);
    // = 'Umur'
    var parsedTitle = parsedTitleFn(context);
    // = '$parse Service'
    var parsedDoSomething = parsedDoSomethingFn(context);
    // shows you an alert 'Umur'
}
So this is very cool, we can evaluate strings with a context safely. Let's write a very basic myClick directive.
angular.module('my-module', [])  
    .directive('myClick', function ($parse) {
        return {
            link: function (scope, elm, attrs) {
                var onClick = $parse(attrs.myClick);
                elm.on('click', function (e){
                    // The event originated outside of angular,
                    // We need to call $apply
                    scope.$apply(function () {
                        onClick(scope);
                    });
                });
            }
        }
    });
See, the pure javascript object turns out to the our scope!
This works, but if you look at the docs of ngClick, it lets us to pass $event object to the function. How does that happen? It is because the parsed function acceptes an optional second argument for additional context.
We have access to event object in the click callback, and we can just pass this through.
angular.module('my-module', [])  
    .directive('myClick', function ($parse) {
        return {
            link: function (scope, elm, attrs) {
                var onClick = $parse(attrs.myClick);
                elm.on('click', function (e){
                    // The event originated outside of angular,
                    // We need to call $apply
                    scope.$apply(function () {
                        onClick(scope, {$event: e});
                    });
                });
            }
        }
    });
And the usage:
link  
That's it. You can now make your own directives with $parse.

Bonus

If you don't need to pass additional context, you can save some bytes and remove code of the code. Here is a way to do it cooler. How does it work exercise it left to the reader. Please leave a comment if you think you've found the answer!
angular.module('my-module', [])  
    .directive('myClick', function ($parse) {
        return {
            link: function (scope, elm, attrs) {
                var onClick = $parse(attrs.myClick);
                elm.on('click', function (e) {
                    scope.$apply(onClick);
                });
            }
        }
    });

Thursday, 15 May 2014

AngularJS–Part 3, Inheritance


In this post I want to discuss the aspect of controller inheritance.

JavaScript is not an OO language

Once again it is important to remind ourselves that JavaScript is not one of the classical OO computer languages. Yes, we can write object oriented code in JavaScript but this is certainly not the best language to do so. Much more should we embrace the functional aspect of JavaScript. Many of the popular libraries do this. jQuery seems to be the most prominent example and also AngularJS follows this line clearly. In this regard when talking about inheritance we should not expect the same behavior as we know from C# or Java, which are two of the most popular OO languages.

Controller inheritance

What can I expect then from controller inheritance? Let’s look at a sample right away. We create two controllers, a parent and a child controller. We can add the necessary code to the app.js file of our sample application. Let’s just start with the definition of the empty controllers
image
Whenever we define a new controller we give it a name and add it to the controller collection of our Angular app. The controller itself is a function which wraps the data (or the model) and the logic which constitute the controller. So far our two new controllers are just empty hulls.

Simple variables

Let’s start by defining a simple variable title in the parent controller and content in the child controller. It is important that these are simple (string) variables and not objects.
image
Now we need a view where we use these two new controllers. Let’s create a new HTML page called part3.html. As we have learned in the previous post a controller manages part of a view. Often this is a div tag containing the Angular directive ng-controller whose value is set to the name of the controller. To make the child controller ChildCtrl a true child of the parent controller ParentCtrl the area managed by the parent needs to wrap the area managed by the child controller, or said differently, the child controller must be wrapped by the parent controller. This is a typical layout
image
As you can see, the outer parent div wraps the inner child div . Make sure you don’t forget to also add the ng-app directive referencing our application called myApp. Usually we add the directive to the body tag. Also make sure you have referenced the Angular JavaScript angular.js file and our application JavaScript file app.js. Furthermore we also need our app.css file containing the layout defined so far. I have added the scope class to the two div tags to be able to visually see the parent and the child context or scope on the view.
Now let’s add some input tags that bind to the title and the content values defined in the controllers. We add
  • an input bound to title to the parent div
  • an input also bound to title (defined in the parent controller) to the child div
  • an input bound to content to the child div
image
Save and open the view part3.html in your favorite browser. You should see something similar to this
image
We can nicely see how the child area is nested inside the parent area. We can also see how the binding works as we see the texts displayed as we have defined them in the controllers. It is important to note how the child inherits the title value from its parent.
Now type something into the first input box (owned by the parent controller) and observe how the text in the input box owned by the child controller changes too.
image
That’s what we expect, right? But now to the interesting part, change the text in the input box in the child area and observe the outcome.
image
Apparently my changes entered in the child area did not affect the value displayed in the parent area! And if you now change the value in the parent area again, the child value won’t change anymore.
What happened here? The title variable – a simple variable of type string – was defined on the parent $scope. At first the child inherited this value. But then, once the user changes the title value in a control bound to title located in the child area Angular creates a new variable title on the child $scope and from this moment on child and parent title are decoupled. Each controller has its own instance.

Complex types

If we want to avoid this behavior of having a local instance in the child scope we need to use complex types, that is objects. Let’s change our definition in the parent controller as follows
image
Our title is now a property of a variable model which in turn is an object. We also have to adjust our binding in the view as shown below
image
If we refresh the browser and play with the two input boxes we can verify that this time model.title does not get redefined on the client scope and remains a property of the parent scope inherited by the child scope. This is a very important difference in behavior that we need to be aware of.
Now the clever person might ask: “And what happens if I reset the model object all together from the client $scope?”. Ah, good question I say to myself. Let’s try it. Add a button to the child div and bind the click event to a function called setModel.
image
define the setModel on the child $scope as follows
image
Refresh the browser and verify that after clicking the button once again the two input boxes are disconnected. We have now our own instance of model defined on the child $scope.

Inheriting functions

Now we want to explore how functions are inherited. For this purpose we define a function greet on the parent $scope. This function when called just shows an alert box greeting the user.
image
We then add a button to the parent  and one to the child area and bind both click events to this newly defined function
image
Please refresh the browser and confirm that no matter which of the two buttons you click the application will always show the same alert box. With this we have proven that a child controller can indeed inherit functions from its parent controller.
But what happens if we redefine the function greet on the child $scope? Let’s try and define such a function which shows an alert box with a different text.
image
Ok, when doing that we realize that now the button defined in the child area displays the new alert message. This means that we have just broken the inheritance chain and the child has now its very own definition of a function with name greet.

Summary

We have discussed how inheritance works in the context of Angular controllers. In Angular we talk of a child controller if the view area that is managed by the child controller is nested inside the view area that is managed by the parent controller. Simple values (e.g. strings, numbers, booleans, etc.) are only inherited by a child controller as long as they are not redefined on the child $scope. Properties of object on the other hand are always inherited by the child controller as long as we do not redefine the whole object on the client $scope. A child controller also inherits functions defined on the parent controller as long as they are not redefined on the child $scope.
In the next post I will have a look on how we get data from a server by using the $http service provided by AngularJS.


AngularJS–Part 2, the controller


Introduction

This is a series of posts to describe our approach to slowly migrate a Silverlight based client of a huge and complex LOB  to an HTML5/CSS3/JavaScript based client. These posts report on the lessons learnt and are meant to be used as a reference for our development teams. The first part of this series can be found here.
So far we have talked about the view and the model in the last post but we have not yet introduced a controller. A controller contains the (presentation or workflow) logic of our Web client. It is written in JavaScript. AngularJS strongly encourages us to separate concerns and put all logic/code into controllers and keep the view (the html page or html fragment) free from any JavaScript. The model on the other hand is a representation of the data we need to display or change through the user’s input.
We need a place where to put our code and thus we add a new JavaScript file app.js to our folder HelloAngular. We reference this file in our html page after referencing the angular.js file.*)
image
*)I specifically mention this since it happened more than one time to me that I introduced a new file with JavaScript code and forgot to reference it in my view, leaving me wonder why my app would not work as expected…

The application

Now it is time to define an (AngularJS) application. Angular defines modules and for the moment our app is an angular module. We can do this as follows
image
Here my application is an Angular module and is called myApp. The second parameter in the module definition represents the dependencies**) that my module/app has. In our sample it is an empty array meaning that we have no dependencies so far.
**) Angular uses dependency injection similar to what we know from a typical C# application where we use an IoC container.

The first controller

Ok, finally we are ready to define a first controller. We add the controller to the controller collection of our Angular application as follows
image
As a developer used to code with an OO language like C# or Java we have to be aware of the fact that JavaScript is not an OO language. Yes, we can use it in a similar way as an OO language but this is definitely not its strength. Rather should we embrace the functional aspect of the language and code accordingly.
Most modern JavaScript libraries like JQuery and AngularJS do so and one consequence we see right away in the above definition of our first controller called FirstCtrl. In looking at the name of the controller we can identify two conventions typically used in Angular.
  • Names of Controllers are in Pascal Case
  • Names of Controllers have a suffix Ctrl
The actual controller is a function wrapping all the code and state that make up the controller. In the above snippet we have a function with no parameters. As we will see below usually a controller (constructor) has one to many parameters that will be provided to the controller via dependency injection.

Data and scope

Lets first define some data in the controller. We want to define an object with properties whose values can be data bound to the view and whose values can also be programmatically set or changed in the controller. Data in a controller is usually defined on the scope of a controller. Let’s do this
image
But wait a second, what is a scope and how do I get a scope?
A scope as defined by Wikipedia is the part of the program in which a name that refers some entity can be used to find the entity. Here we talk about data, but the same also applies to functions. In JavaScript functions are treated much the same way as data. As we will see when defining an Angular controller we will define the data it deals with and the logic it encapsulates on the scope of the controller.
I get my scope via dependency injection, that is, it is provided to me by Angular. Thus I can just change the definition of my controller as such
image
Note the parameter $scope of the function. Also note that all Angular services or providers are prefixed with a $ sign.
In the above snippet we define an object model on the $scope which has two properties firstName and lastName. The properties are initialized with according values. When we now refresh our page we would expect that the property firstName of the model object is bound to our view and thus the view displays the value “Gabriel”. Try it out… Ok?
It didn’t work. Why not? It’s not working because we did not yet tell Angular to use our application myApp and with it the controller FirstCtrl. Let’s do this then. First we add the name of our application as a value to the ng-app directive which we had previously added to the body tag.
image
then we wrap our little html fragment with the input and the div tag into another div which contains an ng-controller directive. The value of the directive is the name of the controller we have defined.
image
If we now refresh the page our binding works perfectly and the initial value as defined in the controller is displayed both in the text input an the div. And with this we have shown that the binding works from the controller to the view. But does it also work in the opposite direction? To show this we need to add some logic to the controller.

Logic

Let’s add a button to the view whose click event we bind to a function defined in our controller. In the function we just show an alert with the current content of the firstName property of the model object. So let’s first add the logic to the controller. As I mentioned above functions are defined on the $scope of the controller similar to the model or data. We can do this just after the definition of the model.
image
Now we add the button to the view. We use the ng-click directive to bind the click event of the button to the clickMe function in the controller.
image
Note that this is different from the traditional way of doing things, where we would have used the onclick attribute of the button tag to bind the click event to some JavaScript code in the view. When we run the application and enter say “Jack” into the input box and then click on the button an alert box will popup greeting Jack as expected.
image
As trivial as this example seems and as easy as the code looks it is still a quite important concept that we have explored here. I have shown so far how we can data-bind between the model (defined in the controller) and the view as well how we can bind user actions which trigger events on the view to functions defined in the controller.
We are of course not limited to parameter-less function calls. Instead of using the $scope in the clickMe function to get the name we can as well define a name parameter on the function and show its content in the alert box
image
The call in the view has then to be adjusted and we have to pass the model.firstName as a parameter in our function call
image

Multiple controllers per view

We can have multiple controllers per view governing different areas of the view. In such a scenario each controller manages a fragment of the overall page. To visualize this lets define a style that we put on each area managed by a controller. Please add a new file app.css to your folder HelloAngular and reference it from the html page.
image
Add a style .scope to the app.css. This style basically draws a black border around the area which is governed by a single controller.
image
Now duplicate the html fragment in the view managed by the FirstCtrl controller and add a class scope to each of the two fragments.
image
Each of the two html fragments will now be managed by its own instance of the FirstCtrl controller. These two fragments are completely independent from each other as you can verify by yourself when refreshing the view in the browser
image
We can even nest controller instances as shown in the following sample
image
and the according (complete) html is shown here
image

Summary

In this post I have introduced the AngularJS controller. With this we have discussed all three pieces of the MVC (model-view-controller) pattern that is commonly used when building an Angular app. I have shown how we can bind data to the controller and we have proven that the data-binding is indeed a two way binding. We have also learned how to bind an event of a view control (such as the click event of a button) to a function defined in the controller. Furthermore we have briefly discussed how we can have multiple instances of a controller managing different, possibly nested parts of the view. In my next post I will look a bit more closely into the inheritance between controllers and child controllers and compare this JavaScript type of inheritance with the familiar one used in C#.

Wednesday, 14 May 2014

AngularJS

 
This is an introduction to AngularJS and is mainly meant as a internal reference for our development team. More posts on the topic will follow.

Why AngularJS?

AngularJS is one of the most popular Open Source JavaScript frameworks. It is developed by Google and has a huge community surrounding and supporting it. We use AngularJS to migrate the MS Silverlight based client of our complex enterprise application to HTML5/CSS/JavaScript.
Several factors were deciding in the choice of the framework. Alternatives that we have considered were
We have been developing a lot of infrastructure on our own in the past. In the beginning this was a (sometimes huge) advantage but became more and more a burden over time. Thus we decided not to go this route this time and as a consequence to exclude variant one.
Base on our experience with Silverlight we also wanted to avoid a proprietary or closed source solution.
AngularJS seems to have the biggest and most active community. For pretty much any question in and around AngularJS one can find answers on StackOverflow. This is a very important point for a team where not every member is an expert. Quick accessibility of help and insight is a big plus. It is easy to find new developers that have a working knowledge of AngularJS.
AngularJS is extremely simple to start with. Let’s just do it

Let’s start with AngularJS

To start coding with angular we need nothing else then download the angular.js file (stable branch, uncompressed) from here and use a text editor like Notepad++, Vim or Sublime to name just a few.
  1. Create a new folder HelloAngular.
  2. Download the angular.js file.
  3. Copy the downloaded JavaScript file angular.js into the above folder.
  4. Using your favorite text editor create a new file step1.html in the same folder.
  5. Add the necessary html tags for a standard HTML5 web page
    image
  6. Add angular.js to the page by adding a

Friday, 9 May 2014

Java Collections : Internal Working

Java Collections:

Java provides many collection classes that can be used to store data. Knowing which collection class to use for best performance and optimum result is the key. In this section we will see how these different collection classes work internally.


ArrayList
ArrayList works on the principle of creating a array and adding elements to it.
ArrayList class has a member variable elementData which is a Object array;
Object[] elementData;
When we do List l = new ArrayList(); the array elementData is initalized with a size of 10

add(E element)
When a new element is added the capacity of the array elementData is checked and if it is completely
 filled that is all element 10 are filled a new array is created with a new capacity by using Arrays.copyOf.
 If the elementData array is not exhausted the new element is added in the array.
So adding a element in a array may take more time as a completely new array needs to be created with
greater capacity and the data in the old array is transferred into the new array.
add(index i, E element)
On adding a element at a particular index in ArrayList, ArrayList checks if a element is already present at
that index. If no than the element passed in add() is added at that index, otherwise a new array is created
with the index kept vacant and the remaining element shifted to right.
For Eg:

List<Integer> l = new ArrayList<Integer>();
l.add(1);
l.add(2);
l.add(1,3);
l.add(4);

for(int i:l){
     System.out.println(i);
}


Output
1
3
2
4
Here above we are trying to add 3 and position 1, since position 1 already has value '2'. A new array is
created with value at index 1 kept vacant and the remaining elements are shifted to right. Than the element 3
 is added at index 1.

get(int index)
The element present at that index in that array is returned. This is very fast.

When to use ArrayList
When the requirment is fetch data frequently and adding data is one time activity.

When not to use ArrayList
When the list is updated frequently

To understand ArrayList in more detail follow link Custom Array List. Here a custom Arraylist is created
with basic add and get operations

Linked List
Linked List is a Doubly Linked List as desribed here Double Link List
With the Node called as Entry class having structure as
 class Entry {
 E element;
 Entry next;
 Entry previous;
 }

LinkedList class also has a instance variable of type 'Entry' called 'header'. This is the 'start' element or node of the list.

add(E element )
Every Time we call add(var);  a new instance of 'Entry' class is created and attached at the end of the list.

add(var,positon)
Inserts the specified element at the specified position in this list.
Shifts the element currently at that position (if any) and any subsequent elements to the right.

get(int index)
It iterates through the list and returns the element. This is very expensive and time consuming as opposed to ArraList.get(int index)

When to use LinkedList
When the elements are getting added and removed frequently.

When not to use LinkedList
When you want to access or fetch a element by index.

HashMap
HashMap works on the principal of hashing. It stores values in the form of key,value pair and to access a value you need to provide the key.
For efficient use of HashMap the 'key' element should implement equals() and hashcode() method. equals() method define that two objects are meaningfully equal. hashcode() helps HashMap to arrange elements separately in a bucket. So elements with same hascode are kept in the same bucket together.
So when we want to fetch a element using get(K key), HashMap first identifies the bucket in which all elements of the same hascode as the hashcode of the 'key' passed are present. Than it uses the equals() method to identify the actual object present in the bucket.

Lets see how HashMap implements this logic internally.

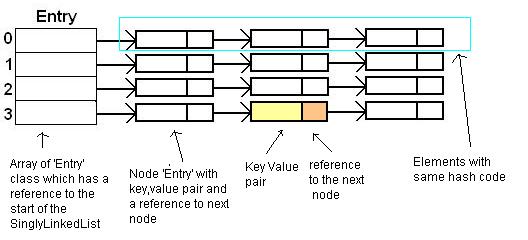
For fast access to a value HashMap places a element (both key and value) in a SinglyLinkedList(Bucket). All the elements that have the same hascode are placed in the same SinglyLinkedList. The number of SinglyLinkedList(buckets) depends upon how many objects are present with different hashcode. To hold these buckets together a array is used. The size of the array is initially defined to 12. And it changes as new elements with different hascodes are added. Lets see the pictorial view.
The structure of the 'Entry' class used above.

class Entry {
   K key;
   V value;
   Entry next;
   int hash;
}

HashMap also has some more variables which define the initial size of the array.

DEFAULT_LOAD_FACTOR = 0.75f;
DEFAULT_INITIAL_CAPACITY = 16;

Entry[] table = new Entry[DEFAULT_INITIAL_CAPACITY];


Hashset
Hashset is a special case
HashSet internally uses HashMap. Yes thats true.
HashSet has a instance variable called 'map' which is a instance of HashMap.

add(E element)
When we add a value in Hashset, Hashset internally adds a value in 'map' by calling put(E,o);
where E that is the key is the element passed in add(E element) of HashSet and 'o' as the value which is a dummy Object creted by doing Object o = new Object; which is common for all key's entered in HashMap 'map'.
HashMap internally checks wether the Key that is 'element' is already present by calling the equals method of 'element'.
This method returns false if the Key is already present in HashMap.

TreeMap
TreeMap is a structure which is designed to work as a Red - Black - Tree. Here each node has only two child nodes and the insertion is a tree happens same as the insertion strategy of Binary Search Tree explained here. So the elements in a TreeMap are always sorted.
The elements added is a TreeMap should implement comparable and provide implementation of compareTo method. On the basis of this TreeMap decides wether the node is smaller or greater than other node. If Comparable is not implemented, a class which is Comparator should be passed in the constructor of TreeMap. If both Comaparable and Comparator are present TreeMap uses Comparator implementation.
TreeMap internally mantains a List of Nodes with each node being a Entry class which is actually a implementation of Map.Entry interface.
The basic structure of this Entry class is 
class Entry{
 K key;
 V value;
 Entry left = null;
 Entry right = null;
 Entry parent;
 boolean color = BLACK;
}
Entry of TreeMap has inetrnally three entries of Entry class : left,right,parent;
When we use put(K,V) method it checks if root is pointing anywhere if no it makes the instance of Entry and point to root;
The constructor of Entry takes key, value and parent. In this case parent is null;
For the next time we enter something using put(K,V) it first identifies the comparison machenism to use. First it check the Comparator class is present or not . This class is passed when creating the instance of TreeMap. If not present it uses the Key's Comparable implementation.
It then traverse through root and compares each node with the node entered and depending upon the comparison places the node either left or right of the parent node.

Thursday, 8 May 2014

Difference between DDL, DML and DCL commands

DDL


Data Definition Language (DDL) statements are used to define the database structure or schema. Some examples:
  • CREATE - to create objects in the database
  • ALTER - alters the structure of the database
  • DROP - delete objects from the database
  • TRUNCATE - remove all records from a table, including all spaces allocated for the records are removed
  • COMMENT - add comments to the data dictionary
  • RENAME - rename an object

DML


Data Manipulation Language (DML) statements are used for managing data within schema objects. Some examples:
  • SELECT - retrieve data from the a database
  • INSERT - insert data into a table
  • UPDATE - updates existing data within a table
  • DELETE - deletes all records from a table, the space for the records remain
  • MERGE - UPSERT operation (insert or update)
  • CALL - call a PL/SQL or Java subprogram
  • EXPLAIN PLAN - explain access path to data
  • LOCK TABLE - control concurrency

DCL


Data Control Language (DCL) statements. Some examples:
  • GRANT - gives user's access privileges to database
  • REVOKE - withdraw access privileges given with the GRANT command

What is Deep Copy and Shallow Copy in Java

Introduction:

The action of copying the attributes of one object into another of same data type is called object copy. In java, we have the following approaches of copying one object into another:
  • Shallow Copy: here if the field which is to be copied is a primitive type, then the value is copied else if the field which is to be copied is a memory address (or an object itself) then the address is copied. Thus if the address is changed by one object, the change gets reflected everywhere.
  • Deep Copy: here the data is copied in both the situations. This approach is costlier and slower.
  • Lazy Copy: This is a combination of the above two approaches. Initially the shallow copy approach is used and then checked if the data is shared by many objects and the program needs to modify an object, the deep copy approach is used.
So we can select the type of copying based on the following two conditions:
  • Use shallow copying when no encapsulation is required.
  • Use deep copying when encapsulation is required.

Shallow Copy:

In shallow copy, a new object is created which contains the exact copy of the values in the original object. Shallow copy follows the bit-wise copy approach. In shallow copy if the field is a memory address, then the address is copied. Thus if the address is changed by one object, the change gets reflected everywhere.
The flow chart describes shallow copy
Figure 1: The flow chart describes shallow copy
In this figure, the object - mainObj1 has fields field1 of a primitive type say int, and an object of type String When we do a shallow copy of mainObj1, mainObj2 is created with field2 of type int which contains the copied value of field1 but the String object in mainObj2 - still points to objStr itself. Since field1 is a primitive data type, the value of it is copied into field2. But since objStr is an object, mainObj2 is pointing to the same address of objStr. So any changes made to objStr via mainObj1 get reflected in mainObj2.

Implementation:

Listing 1: Class SubjectVO.java describes value object for subjects
package com.home.objectCopy;

public class SubjectVO {

 private String name;

 /**
  * @return the name
  */
 public String getName() {
  return name;
 }

 /**
  * @param name 
  * the name to set
  */
 public void setName(String name) {
  this.name = name;
 }

 public SubjectVO(String name) {
  this.name = name;
 }
}
Listing 2: Class PupilVO.java describing value object for pupil
package com.home.objectCopy;

public class PupilVO implements Cloneable {

 // Contained object
 private SubjectVO subj;
 private String name;

 /**
  * @return the subj
  */
 public SubjectVO getSubj() {
  return subj;
 }

 /**
  * @param subj
  * the subj to set
  */
 public void setSubj(SubjectVO subj) {
  this.subj = subj;
 }

 /**
  * @return the name
  */
 public String getName() {
  return name;
 }

 /**
  * @param name
  * the name to set
  */
 public void setName(String name) {
  this.name = name;
 }

 public PupilVO(String name, String sub) {
  this.name = name;
  this.subj = new SubjectVO(sub);
 }

 public Object clone() {
  // shallow copy
  try {
   return super.clone();
  } catch (CloneNotSupportedException e) {
   return null;
  }
 }
}
Listing 3: Class ShallowCopyTest.java describing copy process
package com.home.objectCopy;

public class ShallowCopyTest {

 public static void main(String[] args) {
  // Original Object
  PupilVO stud = new PupilVO("Johnathan", "Algebra");
  System.out.println("Original Object: " + stud.getName() + " - "
    + stud.getSubj().getName());
  // Clone Object
  PupilVO clonedStud = (PupilVO) stud.clone();
  System.out.println("Cloned Object: " + clonedStud.getName() + " - "
    + clonedStud.getSubj().getName());
  stud.setName("Daniel");
  stud.getSubj().setName("Physics");
  System.out.println("Original Object after it is updated: "
    + stud.getName() + " - " + stud.getSubj().getName());
  System.out.println("Cloned Object after updating original object: "
      + clonedStud.getName() + " - "
      + clonedStud.getSubj().getName());

 }

}
Output: The output of this program is as under :
Original Object: Johnathan - Algebra
Cloned Object: Johnathan - Algebra
Original Object after it is updated: Daniel - Physics
Cloned Object after updating original object: Johnathan - Physics
Here we see that the value of the field name gets changed after the copy operation but the value of the object subject remains the same as it is pointing to the same memory address. Hence the subject for Jonathan becomes 'Physics' where as it should be 'Algebra' as the object for SubjectVO in the cloned object remains unchanged.

Deep Copy:

In deep copy, not only all the fields of an object are copied, all the dynamically allocated memory address which are pointed by that object are also copied.
The diagram describes deep copy process
Figure 2: The diagram describes deep copy process
In this figure, the object mainObj1 has fields field1 a primitive data type say int, and an object of type String When we do a deep copy of mainObj1, mainObj2 is created with field2 containing the copied value of field1 and objStr2 is created which contains the copied value of objStr1 So any changes made to objStr1 in mainObj1 will not reflect in mainObj2.

Implementation:

Listing 4: Class describing deep copy
package com.home.DeepCopy;

public class PupilVO implements Cloneable {

 // Contained object
 private SubjectVO subj;
 private String name;

 /**
  * @return the subj
  */
 public SubjectVO getSubj() {
  return subj;
 }

 /**
  * @param subj
  * the subj to set
  */
 public void setSubj(SubjectVO subj) {
  this.subj = subj;
 }

 /**
  * @return the name
  */
 public String getName() {
  return name;
 }

 /**
  * @param name
  * the name to set
  */
 public void setName(String name) {
  this.name = name;
 }

 public PupilVO(String name, String sub) {
  this.name = name;
  this.subj = new SubjectVO(sub);
 }

 public Object clone() {
  // deep copy
  PupilVO pupil = new PupilVO(name, subj.getName());
  return pupil;
 }

}
The only difference between this approach and the earlier approach is that the clone method in the PupilVO returns a newly created PupilVO object. This ensures that whenever the copy mechanism in initiated, the object SubjectVO also gets changed. Deep copy has an alternative approach - serialization. In serialization, the whole object graph is written into a persistent store and read back when required.
So whenever we read the object from the persistent store, the original object is referred.

Usage of shallow copy and deep copy:

There is no hard and fast rule defined for selecting between shallow copy and deep copy but normally we should keep in mind that if an object has only primitive fields, then obviously we should go for shallow copy, but if the object has references to other objects, then based on the requirement, shallow copy or deep copy should be done. If the references are not updated then there is no point to initiate a deep copy.

Explain lazy copy:

A lazy copy can be defined as a combination of both shallow copy and deep copy. The mechanism follows a simple approach - at the initial state, shallow copy approach is used. A counter is also used to keep a track on how many objects share the data. When the program wants to modify the original object, it checks whether the object is shared or not. If the object is shared, then the deep copy mechanism is initiated.

Conclusion:

In shallow copy, only fields of primitive data type are copied while the objects references are not copied. Deep copy involves the copy of primitive data type as well as objet references. There is no hard and fast rule as to when to do shallow copy and when to do a deep copy. Lazy copy is a combination of both of these approaches.